Monday, December 6, 2010

Knifty Knitters

I thought I would create a place with links to patterns and instructions. If no one is interested then at least I have a reference if I need it.  
These are the looms:
The round Knifty Knitters
These are the long looms
They all come with a loom pick & yarn needle
Instructional videos:
loom knitting basics


How to Loom Knit
Links for patterns:
Knitting Pattern Central
Large Christmas Stocking
Gettin it Pegged- Freebies
Bev's Country Cottage *one of my faves*
Rostichery
Spring Knitting
Provo Craft
Loom Lady Lots of cute stuff!

PICS of things I have made with mine:

Wednesday, November 17, 2010

Not yet Party time

 My husband's birthday is coming up and we are having a mustache party. lol
He will be 24 years old this year. The party will be a lot of fun. I am going to make mustaches for everyone to wear and today I put together a mustache pinata.
It was very easy! I used cardboard boxes, crepe paper, tape and glue. (I ended up only using one roll of crepe paper).
Isaiah modeling the mustache
 Once two sides were cut out I took strips of cardboard that I made bendy and pliable by running it down the side of my table. I taped the sides on to the mustache cutouts (be sure to leave a gap at the top to insert the candy in!). Then I took the crepe paper and glue and covered the mustache! If I had black tissue paper on hand I would have covered the whole thing with it first.


The completed pinata. I still need to fill with candy and hook a wire to it so it can hang .
.

Holiday ready

Yesterday I made a new dessert that was very yummy and perfect fr the holidays. It was a ginger snap pumpkin dessert. It was quite good and pretty easy to make. The top crust wast crunchy and buttery while the center was soft and pumpkiny, almost like cheesecake. The bottom crust was cake-like and delicious. I love pumpkin and I love gingersnap, together it was awesome!
Here is the recipe from the website I got it from.

Gingersnap-Pumpkin Dessert Recipe

Gingersnap-Pumpkin Dessert Recipe
Photo by: Taste of Home
  • Prep: 40 min. Bake: 70 min. + cooling

Ingredients

  • 1 package (18-1/4 ounces) yellow cake mix, divided
  • 1 cup crushed gingersnap cookies
  • 1/2 cup butter, melted
  • 1 egg, lightly beaten

  • FILLING:
  • 1 package (8 ounces) cream cheese, softened
  • 2/3 cup packed brown sugar
  • 3 eggs, lightly beaten
  • 1 can (29 ounces) solid-pack pumpkin
  • 1/4 cup 2% milk
  • 2 teaspoons ground cinnamon
  • 2 teaspoons Spice Islands®, All Natural, No Corn Syrup Added, Pure Vanilla Extract

  • TOPPING:
  • 1/2 cup crushed gingersnap cookies
  • 1/4 cup sugar
  • 1/2 cup cold butter, cubed
  • 1 cup chopped pecans
  • Additional gingersnap cookies, halved, optional

Directions

  • Set aside 1 cup cake mix for topping. In a small bowl, combine gingersnap crumbs and remaining cake mix; stir in butter and egg. Press onto the bottom of a greased 13-in. x 9-in. baking dish; set aside.
  • For filling, in a large bowl, beat cream cheese and brown sugar until smooth. Beat in eggs. Beat in the pumpkin, milk, cinnamon and vanilla and mix well. Pour over crust.
  • For topping, in a small bowl, combine the gingersnap crumbs, sugar and reserved cake mix; cut in butter until crumbly. Stir in pecans. Sprinkle over filling.
  • Bake at 325° for 70-75 minutes or until filling is set and a thermometer inserted near the center reads 160°. Cool on a wire rack for 1-1/2 hours. If desired, garnish each serving with a gingersnap half. Store in the refrigerator. Yield: 15-18 servings.
Then after all the baking, while the dessert was cooling I decided to knock out another Christmas gift. I put together another pillow pet, this one for my niece Evelyn.


Here is the tutorial for the pillow pets...
12 Crafts til Christmas

Monday, November 15, 2010

More home-made Christmas gifts

I finished a few Christmas gifts today. One I had been working on for a few days and the other only took an hour or so. First my scarf, I made it for my mom. It took more yarn and time then I thought to begin with but turned out thick, soft and very pretty.
Then I decided to try something new using my Knifty Knitter flower loom and I ended up with a doll for Grace for Christmas. I am pretty pleased with its outcome. :)

Thursday, November 11, 2010

The Swag that saved Christmas

I am going to take a moment and promote for SwagBucks for this simple reason, without it our Christmas would undoubtedly be small and on the pathetic side.
I started at the end of August and have been participating pretty lazily and yet I have earned $125 in Amazon gift cards. We spent part of it a while back on my husband but the remainder is all going to Christmas.
If you are interested it is really easy. All you do is use their search engine for your searching. There are ways to earn extra bucks by doing the Daily Poll, checking the survey board and going through the NOSO. Plus if you follow Swagcodez on FaceBook they tell you when a code is out for bonus bucks.
It does not take long for things to add up and it pays off in the end. Check it out!

Search & Win

Thursday, November 4, 2010

Felt like Christmas

Today I got the materials for the kids next Christmas gift. I don't know what to call them really, they are essentially felt paper dolls.  Here they are completed.

All the clothing are individual pieces and for my daughter's I made a blonde wig and a brown one.


Now as for how I made them. It is VERY simple and quick, not to mention inexpensive!


The materials I used were 8x10 canvases that I got at Michael's a while back on sale (paid under $5 for a set of 3). Hot glue gun and glue and a bunch of sheets of felt. I only spent $2.50 total on the two gifts.

First step pick your background.
Hot glue it to the canvas. I only put the hot glue on the back and tried to make the corners look as nice as possible.


The next step was to create the people. I traced a template from here. I used it to curt out my felt bodies. The clothes and accessories I just got creative with! I hot glued the person to the back ground but not all the clothes so the kids could dress their person up however they want to.
I then hot glued fabric to the back of the canvas board to make a pocket to hold all the pieces!

I just used scrap fabric, you can use a sheet of felt if you wanted.  I really think the kids will like dressing their little people up. I know I am not done making felt clothes for these yet and that is okay by me, I still have tons of felt left!

Wednesday, November 3, 2010

I Spy

 So I am still working on Christmas under $100. That is my goal. Provide a good Christmas for all THREE of my kids and spend under $100. I can do it! This is the latest gift I have made for their Christmas.
It is an I Spy game.
I bought this plastic see-through paint can at Micheal's for $1.99, collected odds & ends to "spy", and a bag of rice at the grocery store.
It is an easy concept. Just fill the can part of the way with rice and add all the assorted odds & ends then more rice on top. Once it is full the lit its on tightly and can only be removed with a coin or flat head screwdriver. The kids take turns. You shake the can and say "I spy something [fill in the blank]"  Pass the can to the other player and they try to figure out what you spied. Shake the can and it is a completely new game! This gift only cost $3.00.  :D


Tuesday, November 2, 2010

pumpkin buttercream

It was just one of those days. I wanted butter cream frosting. I didn't care on what. So why not pumpkin butter cream? We made some sugar cookies from this recipe.
Then followed with pumpkin butter cream recipe.
They turned out QUITE yummy.
 My icing skills took a back burner and the kids helped to ice these cookies. They are delicious! S if you get a hankering for butter cream of a different type, try this pumpkin recipe!

Friday, October 29, 2010

Thinking Ahead

I am planning ahead for Christmas. Being a stay at home mom, we don't have as much money to work with for gifts. So I have decided to make as many of the gifts as possible. I have been scouring the internet and crafty blogs for weeks now. I have a list of things I plan on making. One of the things I found my daughter has been asking for on for months now, a pillow pet. I made one for Isaiah and one for Grace yesterday and I am quite pleased with their turn out!


I have quite a few things left on my list to make and I am still looking for more ideas. :)

Wednesday, October 27, 2010

Pumpkin Waffles

I was just about to make myself a bowl of cereal for breakfast and changed my mind. There was a recipe I came across that I have been wanting to try and oh my what a great decision!!
Pumpkin Waffles & Apple Cider Syrup

Ingredients

  • 2 1/2 cups all-purpose flour
  • 4 teaspoons baking powder
  • 2 teaspoons ground cinnamon
  • 1 teaspoon ground allspice
  • 1 teaspoon ground ginger
  • 1/2 teaspoon salt
  • 1/4 cup packed brown sugar
  • 1 cup canned pumpkin
  • 2 cups milk
  • 4 eggs, separated
  • 1/4 cup butter, melted
  •  
  • APPLE CIDER SYRUP
  • 1/2 cup white sugar
  • 1 tablespoon cornstarch
  • 1 teaspoon ground cinnamon
  • 1 cup apple cider
  • 1 tablespoon lemon juice
  • 2 tablespoons butter

Directions

  1. Preheat a waffle iron according to manufacturer's instructions.
  2. Combine the flour, baking powder, cinnamon, allspice, ginger, salt, and brown sugar in a mixing bowl. In a separate bowl, stir together the pumpkin, milk, and egg yolks. Whip the egg whites in a clean dry bowl until soft peaks form.
  3. Stir the flour mixture and 1/4 cup melted butter to the pumpkin mixture, stirring just to combine. Use a whisk or rubber spatula to fold 1/3 of the egg whites into the batter, stirring gently until incorporated. Fold in the remaining egg whites. Cook waffles according to manufacturer's instructions.
  4. To make the syrup, stir together the sugar, cornstarch, and cinnamon in a saucepan. Stir in the apple cider and lemon juice. Cook over medium heat until mixture begins to boil; boil until the syrup thickens. Remove from heat and stir in the 2 tablespoons of butter until melted. Serve warm. 
Isaiah enjoying his SECOND waffle :)


Tuesday, October 26, 2010

Our last day of Fall Break

  I said that not having any money would not put a damper on our last day of Fall break and I meant it. We had a lot of fun! Grandma and Grandpa sent Isaiah home with a bird house kit that we assembled and Isaiah painted!

Which we then followed with a tea party in the living room with the tea set we painted on a separate occasion. We had sparkling apple cider "tea" and Nilla wafers.


                                                                                                             Cheers!


We also had a picnic in the living room floor on an old tablecloth and watched a cool movie together.
All in all it was a pretty decent day. :D

Sunday, October 24, 2010

Missing them

For Fall break the kids have been out of town with their Grandma & Grandpa. I missed them before they even left! Today is the day they come home!! I am beyond excited. My oldest doesn't have school tomorrow so I am racking my brain trying to think of something cheap/free & fun to do with the kids tomorrow. My husband will be at work so it will just be the kids and I. I am still no where near 100% with my health but I won't let it get in my way! We are going to do something fun!
Now in the spirit of DIY crafty fun I am going to share some of my favorite blogs!
Dollar Store Crafts
Everything your mama made (TONS of free tutorials)
Make It - Love It
The crafty crow

I know there are more that I have bookmarked and frequent but I cannot locate their links currently. I love finding new blogs! :D

Friday, October 22, 2010

Date night


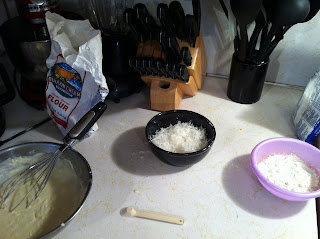
My husband and I don't get to go out often because we have three children and don't live very close to family. Well, this week is Fall break and our two older children are staying at Grandma & Grandpa's house. We didn't have a sitter for the baby or much money for eating out so we decided to cook ourselves a fancy dinner at home. It was actually quite fun and very delicious!
We had steak, asparagus, croissants and coconut shrimp. 
Here is the recipe for the coconut shrimp. They turned out to be AMAZING!
Coconut Shrimp [link to original recipe]

Ingredients

  • 1 egg
  • 1/2 cup all-purpose flour
  • 1 can coconut milk
  • 1 1/2 teaspoons baking powder
  • 1/4 cup all-purpose flour
  • 2 cups flaked coconut
  • 24 shrimp
  • 3 cups oil for frying

Directions

  1. In medium bowl, combine egg, 1/2 cup flour, coconut milk and baking powder. Place 1/4 cup flour and coconut in two separate bowls. 
  2. Hold shrimp by tail, and dredge in flour, shaking off excess flour. Dip in egg/beer batter; allow excess to drip off. Roll shrimp in coconut, and place on a baking sheet lined with wax paper. Refrigerate for 30 minutes (or freezer for 15, the is an important step!). Meanwhile, heat oil to 350 degrees F (175 degrees C) in a deep-fryer.
  3. Fry shrimp in batches: cook, turning once, for 2 to 3 minutes, or until golden brown. Using tongs, remove shrimp to paper towels to drain. Serve warm with your favorite dipping sauce. 
 
We really enjoyed having a fancy dinner at home. We even had some sparkling cider in champagne glasses to make it feel like more of a special occasion. I think next time we can do something like this again, we will!

Thursday, October 21, 2010

Rainbow Meditations


 I had a lucky streak this week because I also won a drawing from Rainbow Meditations. It was a MYSTERY prize. :D
I received in said mystery prize today! I couldn't wait to tear open the package and see what I won!
Can you feel the anticipation?! What could it be?

 oooooh the colors......

And we have it! It fits! :)
Thanks Rainbow Meditations for the prize! It is so vibrant and adorable!


Goats Milk Goods

I was fortunate enough to win a drawing that Goats Milk Goods had on their Facebook. I won three standard size bars. I chose Tea Tree Oil, Coconut and Oatmeal Milk & Honey Scrub.
My first impression upon receiving the soaps was how great they smell!! The smell stayed on my hands for awhile after opening and checking out the bars. I got my husband to test out the oatmeal milk & honey scrub bar when he got home. He said that it was really nice! It had a bit of a scrub to it, but not too abrasive, a good scent and didn't dry out his skin.
I cannot wait to try out the Tea Tree Oil bar. I am hoping it helps to improve my skin. My son had sensitive skin as well so we are going to see how he reacts to the soap!
I think I may have to order more and perhaps even try out some of their all natural bath bombs or lip balm!

Wednesday, October 20, 2010

The Beginning

So here it is, the beginning of my blogging career. :D
I am hoping that I can write something remotely entertaining and possibly even enlightening. This is just going to be a collection of thoughts and ideas from my day to day life as a mother and wife. As I sit here sipping my coffee and listening to my husband get our youngest ready for bed, I have many thoughts running through my head about my future post and all the things I can share. So until the next time!